Part 4: How to Deploy a ChatGPT Model or LLM
by Natalia Kuzminykh , Associate Data Science Content Editor
In our previous articles, you learned how to build and train your personal ChatGPT model (large-language model). However, it’s important to understand that these models are merely components within a larger software landscape. After achieving adequate performance in a controlled environment, the next step is to integrate it into your broader system.
This process of exposing the AI product to users is what we call deployment. In this piece, we’ll explore various aspects of this process and discuss strategies and tools that can help us successfully navigate it. But before we go any further, let’s clarify some key points of the development workflow.
Deployment of LLM Models
The development phase provides us with a controlled, predictable, and isolated environment conducive to testing and experimentation. It’s a space where models can be tested without the pressure of real-world requirements or the significant consequences of errors.
On the other hand, the production environment exposes models to the real world, actual user interactions, and expectations of high availability and reliability. The transition between these two separate steps entails a variety of other disciplines like software engineering and ML engineering, and careful refining of the model to improve robustness. Furthermore, it can also include optimizing the model to improve non-functional metrics like latency or integrating it with other systems to achieve seamless functionality.
Thus, it’s wrong to think of the LLM as the crux of the application or think this marks the end of the development. Elements such as data dependencies, model complexity, reproducibility, testing, monitoring, and version modifications play a more significant role in maintaining a practical LLM-powered solution. As illustrated below, the LLM code is merely a fraction in the grand scheme.
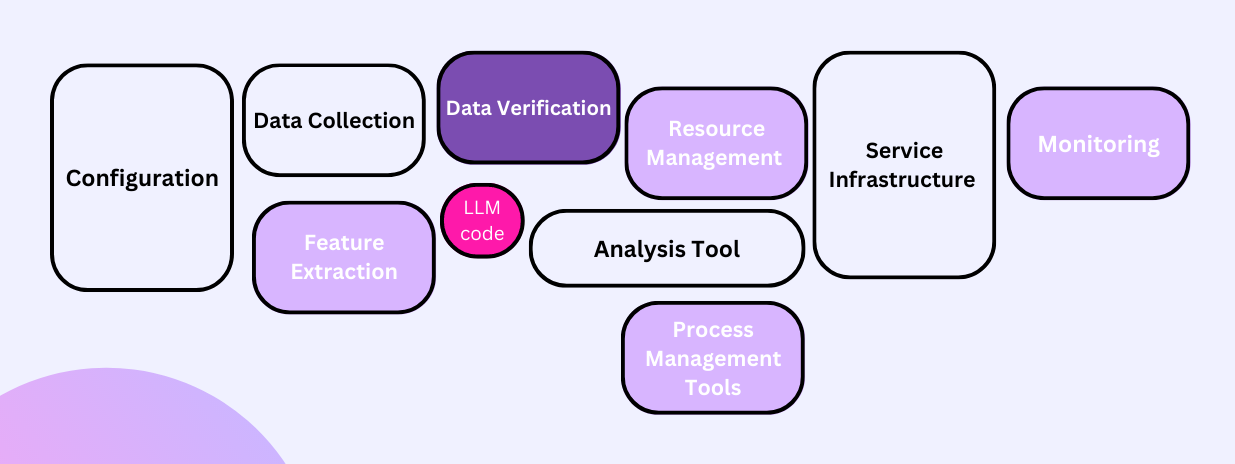
These ancillary components bring the whole application to life, transforming it from theory to practice. Let’s look at an example to understand the deployment of an LLM model into a larger system.
ChatGPT Deployment Example
Let’s say we’re trying to develop a intelligent QA assistant for our company’s customer service department. The goal is to allow clients to access company information without the need for direct human interaction.
We worked hard on data processing and standardization, feature design, and testing a range of configurations. We built a customized large language model that receives queries as input and provides responses based on company-specific information. So, what’s next?
Exposing LLMs to Users via a REST API
For prototyping and minimal viable AI products, you might consider using frontend-focussed prototyping systems like Streamlit or Gradio.
But a more flexible enterprise approach would be to build a service that exposes a REST API as a bridge between external components and the underlying model. This enables communication with the model, asking users questions and receiving appropriate responses. The implementation of such a service can be achieved using popular web frameworks such as Flask or FastAPI.
Alternatively, for internally-focussed use cases that require more efficient communication or support for bidirectional streaming, gRPC can be also an excellent choice. It offers advantages like lower latency and better support for client-server communication in various languages.
In our previous article, we introduced the QA Chat Application. Here, we’ll create its endpoint using Flask to form a REST API.
from flask import Flask, request, jsonify

#Initialize the Flask app
app = Flask(__name__)

@app.route('/ask', methods=['POST'])
def ask():

    # Extract question from the incoming JSON request
    data = request.get_json()
    question = data['question']

    # Run the question through the model
    response = llm_chain.run(question)

    # Convert result to JSON and return it
    return jsonify(response), 200

# Run the app
if __name__ == "__main__":
    app.run(host='0.0.0.0', debug=True)
As you can see, we’ve set up a Flask app with debugging enabled to catch any potential issues (debug=True). Our app has a single /ask endpoint, designed to receive POST requests. The endpoint expects a JSON payload with a question field, processes it, and responds with the model’s answer.
Let’s now test out the app to make sure it works! To do so, run the following at your command line:
python flaskapi.py
This initiates the Flask server at http://localhost:5000. Let’s see what our model returns by running the following curl request:
curl -X POST -H "Content-Type: application/json" \
  -d '{"question": "Can you help me understand the steps to set up an online account?"}' \
  http://localhost:5000/ask
Congratulations! You’ve successfully set up a basic deployment of a QA model with Flask.

Of course, this is a very basic example. In a real-world scenario, you’d have to consider many other factors, such as security, quality of service, monitoring, testing, and much more. But for the sake of brevity, let’s move on.
Aside
Enterprise users might consider using an opinionated model serving container (like Triton) and framework (like KServe). These tools provide a more streamlined approach to model deployment, but they also come with a higher learning curve, an increased operational burden, and less flexibility.
Containerization: Reproducible Software in Isolated Environments
Now that the serving code is in place, we need an artefact that allows us to run the service in any environment. Enterprise users have mostly standardized upon containerization using tools like Docker. Containers encapsulate your code in a virtual environment, storing system utilities, libraries, and everything else required for your app’s execution.
Furthermore, containers streamline the orchestration of large-scale deployments across numerous machines, facilitated by tools like Kubernetes –- which we’ll delve into later in this guide.
Before we get into the Dockerfile setup, ensure you have a requirements.txt file, which lists all necessary packages for our microservice. Generate it by executing the following command in your app’s root directory:
pip freeze > requirements.txt
Tip
Consider using Poetry for more advanced dependency management.
Let’s now break down the Dockerfile.
FROM python:3.10.0-slim

WORKDIR /app

COPY requirements.txt .
RUN pip install -r requirements.txt

COPY . .

ENTRYPOINT ["python", "flaskapi.py"]
The first instruction, FROM python:3.10.0-slim, specifies the base image from which you want to start building your new image. In this case, we call the python:3.10.0-slim image, which is a lightweight version containing only essential components.
Then, we copy our requirements.txt file into the current directory of the Docker image (which is /app, as defined by the WORKDIR command).
Once the requirements.txt file is inside the container, we can install all the Python packages listed in it. To do this, we use the RUN command with pip install -r requirements.txt.
Now, we copy the rest of the files and directories from our current build directory into the /app folder with COPY . ..
Lastly, we specify the ENTRYPOINT instruction, which will be executed when our container is launched. Note that it’s set to run python flaskapi.py, which launches our Flask server.
To make your Docker image, go to the folder with your Dockerfile and type docker build -t flaskapi .. Assuming everything is working correctly, you should see a step-by-step rundown of the build:
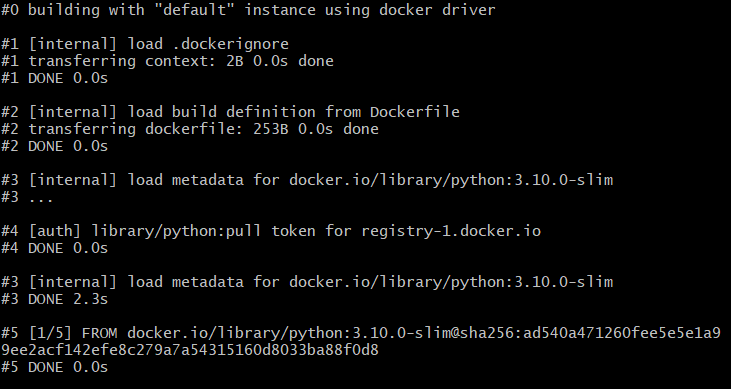
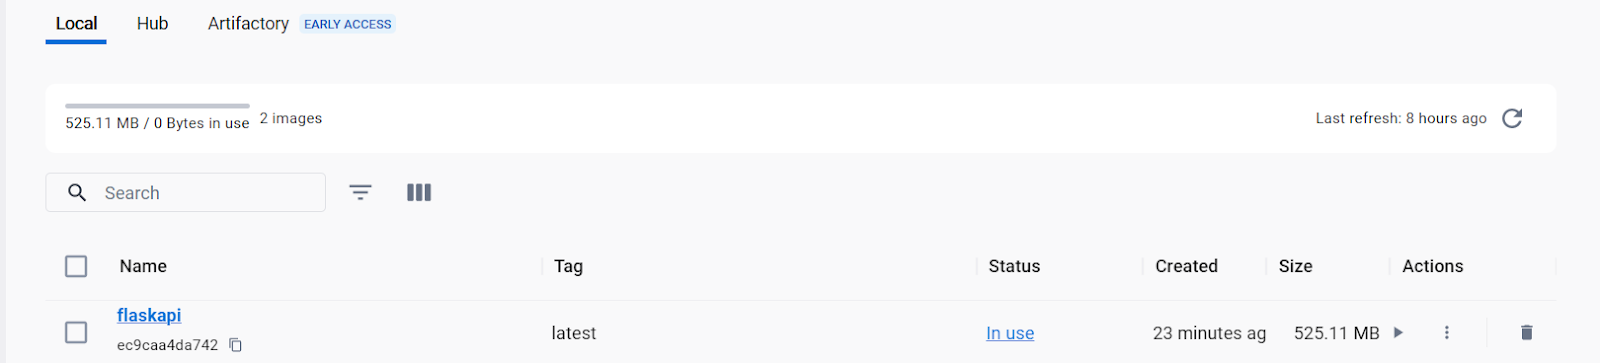
You can also view it in Docker Desktop among the available container images.
Next, to launch the container with the Flask deployment script, execute the following command:
docker run -p 5000:5000 -t flaskapi
This command tells Docker to launch the flaskapi container and map port 5000 inside the container to port 5000 on your host machine. As a result, your Flask application should be up and running inside the container.
Congratulations! Your code is now live and operational.
Cloud Deployment: Scaling for High Demand
Deployment of ChatGPT-like models involves also addressing many challenges, including balancing load, minimizing latency, maximizing throughput capacity, and ensuring high availability and reliability.
Until now, our API has been optimized for moderate traffic volumes. But when deploying to a service dealing with millions of users, we’ll have to significantly change the deployment strategy. That’s why propriety cloud services like AWS SageMaker or open source projects like Kubernetes aim to simplify these engineering tasks.
Kubernetes
Kubernetes (k8s) is known for its highly effective approach to container orchestration and management across large deployments. Kubernetes has a fairly steep learning curve, which is why clusters are often managed by separate teams. But Kubernetes is so prevalent, experience with it is a valuable skill to have.
To run Kubernetes locally, you can use minikube. It’s a tool that allows you to run a single-node Kubernetes cluster on your local machine. Follow the steps below.
- Setup: Install
minikube; - Initialization: Run
minikube start; - Deployment: Create using
kubectl create deployment hello-minikube --image=flaskapi; - Access the deployment with
kubectl expose deployment hello-minikube --type=NodePort --port=8080
Conclusion
Deploying large language models like ChatGPT requires careful consideration of several factors in advance. These include the scale of the deployment, the choice of tech stack, inference latency, server load, among others.
However, with a clear understanding of the process and access to the right tools, you can navigate these challenges successfully. Some best practices to consider are:
- Develop thorough testing strategies to ensure the model performs as expected.
- Consider whether to use a custom Python backend or a pre-built solution like Triton or KServe.
- Leverage containerization to ensure a consistent and isolated environment.
- For scalability, leverage cloud-scale solutions like Kubernetes.
In our next article, we’ll focus on monitoring the deployed model. This step ensures that the model performs optimally and allows for ongoing improvements and adjustments as needed. Monitoring plays a crucial role in maintaining the reliability and effectiveness of the deployed LLM.