A Comparison of Open Source LLM Frameworks for Pipelining
by Natalia Kuzminykh , Associate Data Science Content Editor
Integrating an open source LLM framework into your project doesn’t have to be difficult or expensive, thanks to the variety of LLMOps tools available today. Our LLM consulting services help organizations select and implement the right framework. Open-source LLM orchestration frameworks offer practical solutions for specific business challenges and come with the additional benefit of a big supportive community. However, these tools each have their own set of pros and cons.
Firstly, it’s important to understand that “free” doesn’t necessarily mean without any cost. LangChain, for example, offers both the LangSmith platform for optimization and the LangGraph component for building complex, controllable AI-driven flows as open-source. Yet, some tools may provide only one of these components as open-source while keeping the other proprietary. Also, don’t forget that although many LLMOps are free in terms of licensing, the long-term expenses for hosting a finished application and maintaining the backend can add up, so it’s worth considering this before you commit to your chosen LLMOps tool.
Another essential consideration is that such a library or framework should be able to seamlessly integrate with your existing LLM architecture. To help with this, we have compiled a list of the best LLM frameworks and community-approved LLM technologies for various stages of model development and skill levels.
LLM Framework Evaluation Criteria
In our evaluation of LLM frameworks, we combined subjective analysis with some objective metrics, primarily sourced from GitHub. We closely examined repository statistics, such as the number of stars, to estimate the framework’s popularity. However, it’s important to note that this metric can be misleading, as a higher number of stars may simply reflect more effective marketing strategies.
Our evaluation criteria included modularity, ease of use, flexibility and maturity. We also considered simplicity, although it sometimes conflicts with modularity and flexibility. We formed our opinions by weighing these criteria against each other in order to make an informed decision.
This article is divided into three main sections:
- key LLM-oriented libraries, which compares Llamaindex vs LangChain,
- low-code solutions for model integration, and
- tools to assist with RAG integration.
Overview of Top LLM Frameworks
LangChain
- License: MIT
- Stars: 89.3k
- Contributors: 2,939
- Current Version: 0.2.20
LangChain is a versatile open-source LLM orchestration framework designed to simplify the development of AI applications. It serves as a unified platform, providing a cohesive environment where developers can seamlessly develop and integrate popular large language models with external data sources and software workflows.
For example, suppose you want to build a QA chatbot that can guide you through information from sources like Slack chats, PDFs or CSV files. With LangChain, you can easily achieve this by selecting an appropriate data loader or adapting one from Llama Hub. You can then define the best vector database provider, whether cloud-based or local, and incorporate monitoring tools such as LangSmith.
Langchain is a modular python LLM library. The modular structure of LangChain allows easy comparison of different prompts and AI models, minimizing the need for extensive code modifications. This flexibility is especially useful for combining multiple LLMs within a single environment, reducing costs and ensuring smooth fallbacks from one model to another if there are unexpected challenges.
Installing LangChain
The core code is freely available on GitHub. To install it in Python, please run:
pip install langchain
If you need all the dependencies for LangChain, rather than selectively installing them, use:
pip install langchain[all]
Adding popular large language models is typically straightforward and often requires just an API key from the provider. The LLM class offers a standardized interface for all supported models. Note that while proprietary models from providers like OpenAI or Anthropic may come with associated costs, many open-source models such as Mixtral or Llama, are easily accessible through Hugging Face.
Another key feature of LangChain is its use of chains, which combine LLMs with other components to perform sequential tasks. In version 1, widely used chains like LLMChain and ConversationalRetrievalChain are prevalent. However, the latest version, v2, introduces a new approach that encourages the creation of custom chains through LangChain Expression Language (LCEL) and the Runnable protocol.
from langchain_openai import ChatOpenAI
from langchain_core.prompts import ChatPromptTemplate
from langchain_core.output_parsers import StrOutputParser

prompt_template = "tell me a joke about {topic}"
prompt = ChatPromptTemplate.from_template(prompt_template)

llm = ChatOpenAI()
chain = prompt | llm | StrOutputParser()
chain.invoke({"topic": "bears"})
The example above demonstrates how to initialize a model alongside a prompt template. By saving a prompt as prompt_template and using ChatOpenAI(), you can create a processing chain that generates a joke from a given topic. The chain is defined as chain = prompt | llm | StrOutputParser(). Here, the | symbol acts similarly to a Unix pipe operator, seamlessly taking output from one component and passing it as input to the next. So, in this sequence:
- The user’s request is fed into the prompt template.
- The prompt template’s output is then processed by the OpenAI model.
- The model’s output is handled by the output parser.
To run the chain with a specific input, you simply call chain.invoke({"topic": "bears"}).
LlamaIndex
- License: MIT
- Stars: 33.7k
- Contributors: 1,088
- Current Version: v0.10.55
If you’re familiar with LlamaIndex, you’ll notice its similarities to the LangChain library. However, it stands out in its performance for search and retrieval tasks. Its effectiveness in indexing and querying data makes it an excellent choice for projects requiring robust search capabilities.
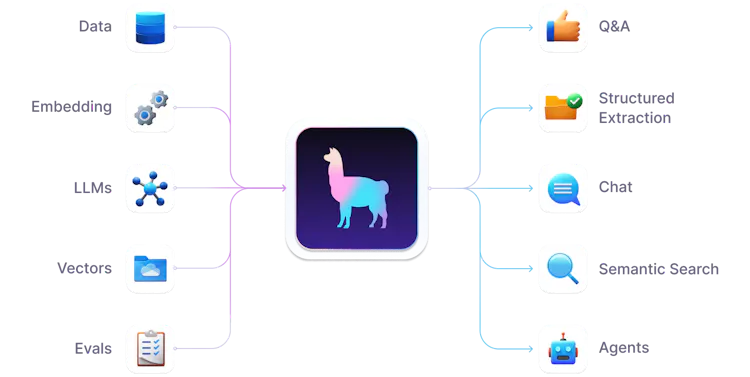
One of the key advantages that LlamaIndex has over LangChain in RAG is its enhanced schema for loaded data.
LlamaIndex offers a more detailed and structured metadata schema that includes file-specific information such as the file name, type and size, as well as creation and modification dates. Additionally, it supports exclusion lists for metadata keys that should be ignored during embedding and LLM processing, providing flexibility in selecting which information is utilized. Furthermore, it enables customizable templates for both text and metadata, granting users greater control over how document information is presented.
- LangChain’s Document Schema
[Document(
    metadata={'source': '/content/data/text.txt'},
    page_content='\n\nWhat I Worked On\n\nFebruary 2021\n\nBefore college the two main things I worked on, outside of school, were writing and programming....Thanks to Trevor Blackwell, John Collison, Patrick Collison, Daniel Gackle, Ralph Hazell, Jessica Livingston, Robert Morris, and Harj Taggar for reading drafts of this.'
)]
- LlamaIndex’s Document Schema
[Document(
    id_='972f6e28-6a0f-43a4-9e1e-6df1c4373987',
    embedding=None,
    metadata={
        'file_path': '/content/data/text.txt',
        'file_name': 'text.txt',
        'file_type': 'text/plain',
        'file_size': 75393,
        'creation_date': '2024-07-17',
        'last_modified_date': '2024-07-16'
    },
    excluded_embed_metadata_keys=[
        'file_name', 'file_type', 'file_size', 'creation_date', 'last_modified_date', 'last_accessed_date'
    ],
    excluded_llm_metadata_keys=[
        'file_name', 'file_type', 'file_size', 'creation_date', 'last_modified_date', 'last_accessed_date'
    ],
    relationships={},
    text='\r\n\r\nWhat I Worked On\r\n\r\nFebruary 2021\r\n\r\nBefore college the two main things I worked on, outside of school, were writing and programming...Thanks to Trevor Blackwell, John Collison, Patrick Collison, Daniel Gackle, Ralph Hazell, Jessica Livingston, Robert Morris, and Harj Taggar for reading drafts of this.',
    mimetype='text/plain',
    start_char_idx=None,
    end_char_idx=None,
    text_template='{metadata_str}\n\n{content}',
    metadata_template='{key}: {value}',
    metadata_seperator='\n'
)]
If you decide to use this module, be aware that LlamaIndex documentation can, however, be unreliable. The library undergoes frequent changes, which means that you could spend a significant amount of time resolving inconsistencies and compatibility issues when following official documentation or tutorials.
Installing LlamaIndex
LlamaIndex supports both Python and TypeScript, with OpenAI’s GPT-3.5-turbo as its default language model. To get started, you need both to set up your API key as an environment variable and ensure that you installed the library correctly.
For macOS and Linux, use the following command:
export OPENAI_API_KEY=YOUR_API_KEY
On Windows, use:
set OPENAI_API_KEY=YOUR_API_KEY
To install the Python library, run:
pip install llama-index
Configuring LlamaIndex Documents
Place your documents in a folder named data. Then call a SimpleDirectoryReader loader and a VectorStoreIndex to store them in memory as a series of vector embeddings:
from llama_index.core import VectorStoreIndex, SimpleDirectoryReader
# Load documents from the data folder
documents = SimpleDirectoryReader("data").load_data()

# Create an index from the loaded documents
index = VectorStoreIndex.from_documents(documents)
Now you can create an engine for Q&A over your index and ask a simple question.
# Create a query engine from the index
query_engine = index.as_query_engine()

# Ask a question
response = query_engine.query("What did the author do growing up?")
print(response)
You should receive a response similar to: “The author wrote short stories and tried to program on an IBM 1401.”
Haystack
- License: Apache-2.0
- Stars: 14.7k
- Contributors: 262
- Release: v2.3.0
Haystackis often favored for its simplicity and is frequently chosen for lighter tasks or quick prototypes. It’s particularly useful for developing large-scale search systems, QAs, summarization and conversational AI applications.
Since its launch in 2017, Haystack has evolved into a powerful tool, particularly excelling in semantic search. But, unlike simple keyword matching, it understands the context of users’ queries. It also has specialized components for various tasks, enabling it to manage everything from data ingestion to result generation. This significantly sets it apart from more general-purpose frameworks like LlamaIndex and LangChain.
One of Haystack’s strengths lies in its extensive documentation and active community, which simplifies the onboarding process for new users and provides ample support. Despite its focus on document understanding and retrieval tasks, which could be seen as a limitation compared to the broader capabilities of other frameworks, Haystack is ideal for enterprise-level search. It’s particularly well-suited to industries requiring precise and contextual information retrieval, such as finance, healthcare and legal sectors. Its specialization also makes it a strong candidate for knowledge management systems, helping organizations provide accurate and contextual information to users.
Installing Haystack
To get started with Haystack, install the latest release using pip:
pip install --upgrade pip
pip install farm-haystack[colab,inference]
Then create a QA system with a DocumentStore, which stores the documents used to find answers. For this case, we use the InMemoryDocumentStore, which is simple to set up and suitable for small projects and debugging. However, it doesn’t scale well for larger document collections, so it’s not ideal for production systems.
import os
from haystack import Pipeline, Document
from haystack.utils import Secret
from haystack.document_stores.in_memory import InMemoryDocumentStore
from haystack.components.retrievers.in_memory import InMemoryBM25Retriever
from haystack.components.generators import OpenAIGenerator
from haystack.components.builders.answer_builder import AnswerBuilder
from haystack.components.builders.prompt_builder import PromptBuilder

# Write documents to InMemoryDocumentStore
document_store = InMemoryDocumentStore()
document_store.write_documents([
    Document(content="My name is Jean and I live in Paris."),
    Document(content="My name is Mark and I live in Berlin."),
    Document(content="My name is Giorgio and I live in Rome.")
])
Next we initialize an InMemoryBM25Retriever, which sifts through all the documents and returns the ones relevant to the question. Afterwards, we set up a RAG pipeline to use a prompt template to generate answers based on retrieved documents and the input question.
# Build a RAG pipeline
prompt_template = """
Given these documents, answer the question.
Documents:
{% for doc in documents %}
    {{ doc.content }}
{% endfor %}
Question: {{question}}
Answer:
"""

retriever = InMemoryBM25Retriever(document_store=document_store)
Finally, with a run() method, you could test your app and ask a question.
prompt_builder = PromptBuilder(template=prompt_template)
llm = OpenAIGenerator(api_key=Secret.from_token(api_key))

rag_pipeline = Pipeline()
rag_pipeline.add_component("retriever", retriever)
rag_pipeline.add_component("prompt_builder", prompt_builder)
rag_pipeline.add_component("llm", llm)
rag_pipeline.connect("retriever", "prompt_builder.documents")
rag_pipeline.connect("prompt_builder", "llm")

# Ask a question
question = "Who lives in Paris?"
results = rag_pipeline.run({
        "retriever": {"query": question},
        "prompt_builder": {"question": question},
    })

print(results["llm"]["replies"])
Overview of Low-Code LLM Projects
Botpress Cloud
- License: MIT
- Stars: 12.3k
- Contributors: 182
- Release: v12.30.9
Botpress is a powerful LLM platform designed to help you create highly customizable chatbots across various channels. It features a flow builder and integrated AI, allowing users to design custom flows with AI capabilities. With Botpress, your chatbot can be trained on personalized data, automatically translate messages, summarize conversations and perform other tasks.
The platform’s low-code approach means you can easily set up your bot without needing to code, while its user-friendly interface makes it easy to handle a variety of tasks within the app, such as booking events, placing orders and managing support cases. The conversation studio in Botpress further simplifies the process by allowing you to drag and drop blocks to create conversational experiences.
Botpress is available as a free, open-source platform, with an Enterprise version for larger businesses that need additional features like Single Sign-On and enhanced role-based access control. The visual interface supports modern software practices, including version control, emulating, and debugging, making chatbot development as straightforward as building any other application.
Installing Botpress
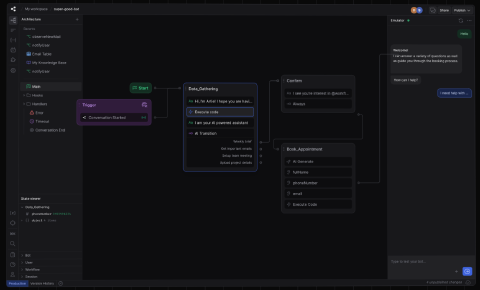
To start building your chatbot with Botpress, follow these steps:
Create an account: You can do this by simply following the instructions on the Botpress website.
Create a new bot:
- After logging in, click on the Create Bot option and select the newly-created bot.
- Next click the Open in Studio button to start editing your chatbot.
In Botpress, each chatbot is part of a workspace. When you first connect to Botpress Cloud, a default workspace is automatically created for you.
Testing: To test your chatbot, you can use a chat emulator to simulate user interactions and test different scenarios and potential edge cases.
Debugging: For authenticated users, the bottom panel will provide additional information about the responses generated by your chatbot. This includes details such as the dialogue engine’s suggestions, natural language intents, and raw JSON payload for more in-depth analysis.
Danswer
- License: Mixed
- Stars: 9.8k
- Contributors: 92
- Release: NA
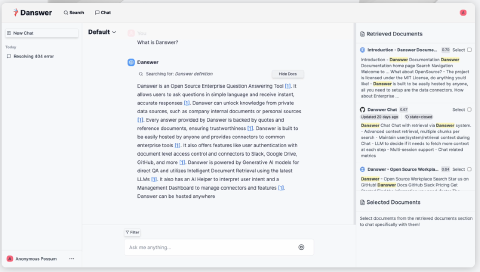
Danswer aims to make workplace knowledge easily accessible through natural language queries, much like a chatbot. This library can be seamlessly used together with workplace platforms like Slack, Google Drive or Confluence, allowing teams to extract information from existing documents, code changelogs, customer interactions and other sources. By leveraging AI, Danswer understands natural language questions and provides accurate, context-relevant responses. Danswer’s capabilities are impressive, as demonstrated by its ability to:
- accelerate customer support and resolution times boost efficiency,
- help sales teams prepare for calls with detailed context.
This is achieved through a combination of: document search and AI-generated answers; custom AI assistants tailored to different team needs; and a hybrid search technology that combines keyword and semantic search for best-in-class performance. Additionally, The Danswer team prioritize user privacy and security with document-level access controls, plus the option to run locally or on a private cloud.
Installing Danswer
To launch Danswer’s platform on your local machine, you need to clone the repo with:
git clone https://github.com/danswer-ai/danswer.git
Navigate to the docker compose directory and initiate a Docker instance:
cd danswer/deployment/docker_compose
docker compose -f docker-compose.dev.yml -p danswer-stack up -d --pull always --force-recreate
Alternatively, to build the containers from source:
cd danswer/deployment/docker_compose
docker compose -f docker-compose.dev.yml -p danswer-stack up -d --build --force-recreate
The setup process can take up to 15 minutes, so don’t worry if it seems lengthy. Once setup is complete, you can access Danswer at http://localhost:3000.
Flowise
- License: Apache-2.0
- Stars: 27.7k
- Contributors: 120
- Release: 1.8.4
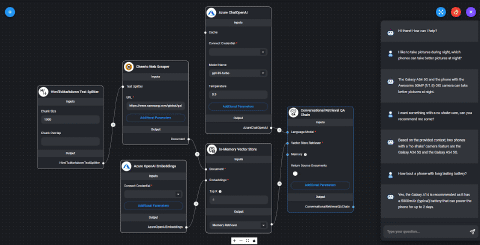
Flowise is another low-code open-source UI platform built on top of LangChain.js. Similarly to LangChain, it focuses on creating customized LLM applications and AI agents. However, Flowise stands out with its user-friendly interface, allowing users to construct LLM orchestration flows and autonomous agents without needing extensive coding knowledge.
While Flowise shares the strengths of LangChain, making it a powerful library, it isn’t an independent tool. This dependency imposes certain limitations on building specific flows or combining different tools. For instance, integrating a LlamaIndex-based loader, which can be done with a few lines of code in LangChain, can be challenging in Flowise. Additionally, Flowise relies on LangChain for updates, resulting in a delay with integrating new features introduced in the LangChain library.
Installing Flowise
Setting up Flowise is simple, whether you prefer using NodeJS directly or leveraging Docker for containerization. For example, to get started with Docker, you should navigate to the Docker folder at the root of the project. Then copy the .env.example file and rename it as .env. Afterwards, you could use Docker Compose to spin up the containers with docker compose up -d. The Flowise application will be available at http://localhost:3000. When you’re done, you can stop the containers with docker compose stop.
Alternatively, you can build a Docker image locally using docker build --no-cache -t flowise .and run it with docker run -d --name flowise -p 3000:3000 flowise. Stopping the Docker image is just as simple with docker stop flowise.
For added security, Flowise also supports app-level authentication. You can enable this by adding FLOWISE_USERNAME and FLOWISE_PASSWORD to the .env file in the packages/server directory:
FLOWISE_USERNAME=user
FLOWISE_PASSWORD=1234
Dify Cloud
- License: Apache-2.0
- Stars: 37.9k
- Contributors: 310
- Release: v0.6.14

Dify is a user-friendly platform that seamlessly integrates BaaS and LLMOps principles to manage data operations and swiftly build production-level applications.
This library offers a comprehensive technology stack, featuring various models, a prompt orchestration interface, and even a flexible agent framework. Furthermore, its intuitive interface and API are designed to minimize time spent on repetitive tasks, allowing developers to focus on business needs.
For those eager to leverage the advancements in LLM technology like GPT-4 but who are unsure how to start, Dify Cloud provides a practical solution. It addresses common issues such as training models with proprietary data, keeping AI up to date with recent events, preventing misinformation, and understanding complex concepts like fine-tuning and embedding. Dify Cloud also enables users to build AI applications that are not only functional but are also secure and reliable, ensuring full control over private data and enhancing domain-specific expertise.
Installing Dify
As with Flowise, this low-code solution could be launched via the Docker instance. Once you download the GitHub repo, you should navigate to the directory where the Docker setup files are located and run:
git clone https://github.com/langgenius/dify.git
cd dify/docker
cp .env.example .env
docker compose up -d
After starting Dify, you need to ensure all containers are running correctly. To check the status of the containers, use:
docker compose ps
You should see several containers listed, each with a status indicating they are up and running. Key services include:
- api: Main application interface
- worker: Background task handler
- web: Web interface
- weaviate, db, redis, nginx, ssrf_proxy, sandbox: Supporting components
Now that Dify is running, you can access it via your web browser: http://localhost/install
Helix
- License: Custom
- Stars: 287
- Contributors: 8
- Release: v0.6.14
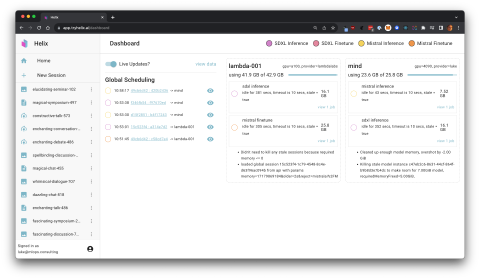
Helix is co-developed by the Winder.AI team as part of our AI product development initiatives. It is a powerful platform that simplifies the deployment and orchestration of large language models. Helix is designed to help users build, train, and deploy AI models with ease, making it an ideal choice for businesses looking to leverage AI technologies without the need for extensive expertise.
One of the key differentiators is the focus on hardware (i.e. machines with GPUs) orchestration. Helix provides a simple and intuitive interface for managing GPU resources, allowing users to easily scale their AI models based on their needs. Like other LLMOps tools, Helix supports a wide range of proprietary LLMs, however Helix focuses on the use of popular open-source LLMs hosted on your own infrastructure.
This also makes Helix a great choice for businesses that are sensitive about the location of their data. By providing on-premise deployment options, Helix ensures that sensitive data remains secure and compliant with data privacy regulations and doesn’t leave your environment.
For users, the platform offers a novel “App” concept, which allows you to create and deploy AI models with just a few clicks. Backed by GitOps, Helix ensures that your AI applications are versioned and can be easily rolled back in case of issues.
Installing Helix
You can try Helix right now by visiting the Helix website. The platform is available as a cloud service, so you can get started without any installation or setup.
If you’re interested in deploying Helix on your own on-premise GPUs, you can follow the installation guide provided on the Helix website. If you need any help, then feel free to get in touch here or on Discord.
Overview of RAG-Oriented Tools
Typesense
- License: GPL-3.0
- Stars: 18.9k
- Contributors: 41
- Release: 0.9.26

Typesenseis a robust search engine, which is particularly appealing due to its handy APIs, exceptional search performance and easy deployment. As an open-source solution, Typesense presents a viable alternative to commercial services like Algolia and a more user-friendly option than Elasticsearch.
One of the most notable features of Typesense is its simplicity in setup. The API is designed to be intuitive, making it accessible for both novice and experienced developers. Another significant strength of Typesense is its typo tolerance, which ensures that users receive relevant search results even when there are spelling errors. This enhances the overall user experience and makes it easier for users to find what they’re looking for.
Typesense also excels at real-time indexing, which is crucial for applications that require immediate updates to search results. Its horizontal scalability makes it well-suited to manage large datasets and handle high query volumes. Additionally, Typesense allows for custom ranking, enabling developers to tailor search results to their specific needs. The inclusion of faceted search capabilities further simplifies the process of filtering and refining search results, making it a versatile and powerful tool for developers.
Verba
- License: BSD-3-Clause
- Stars: 5k
- Contributors: 20
- Release: v1.0.3
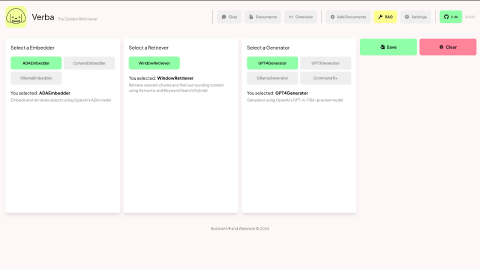
Verba is a highly adaptable personal assistant designed to query and interact with your data, whether it’s stored locally or hosted in the cloud. It allows users to resolve questions about their documents, cross-reference multiple data points and derive insights from existing knowledge bases.
With the release of Verba 1.0, the platform has shown marked improvements in both information retrieval and response generation. Its semantic caching and hybrid search capabilities have greatly improved performance metrics, leading to higher query precision and response accuracy. The tool’s compatibility with multiple data formats, including PDFs, CSVs and unstructured data, adds to its versatility and value. Overall, Verba 1.0 addresses the challenges of precise information retrieval and context-aware response generation through advanced RAG techniques, making it a powerful asset in the AI toolkit for improving the quality and relevance of generated responses.
Inkeep

Inkeep stands out as an innovative solution in the AI-driven support industry, aiming to reduce the volume of support requests for businesses by empowering users with self-help tools. To achieve a strong product-market fit, Inkeep integrates advanced analytics to provide detailed insights into user behavior, helping identify areas for content improvement. By expanding the range of supported content types and languages, Inkeep also makes its platform more flexible and appealing to diverse user groups.
To scale effectively for larger enterprises, Inkeep offers integration capabilities that allow seamless merging of existing enterprise systems and workflows. This focus on technical enhancements helps Inkeep differentiate itself from competitors like Intercom and Zendesk, especially through its advanced document search and contextual understanding features. Addressing technical challenges such as compatibility with diverse document formats, and ensuring high performance in content parsing, will further solidify Inkeep’s position as a leading AI solution.
Best LLM Frameworks for Your Project
In conclusion, selecting the best open-source LLM framework requires a careful balance of factors such as modularity, ease of use, flexibility and technological maturity. Each tool comes with its own set of strengths and limitations, making it essential to align your choice with your specific application needs and technical expertise.
By leveraging the community support and weighing the long-term costs, you can find an open-source solution that not only fits seamlessly into your existing tech stack but also scales effectively with their project’s growth. This comparative analysis provides a solid foundation to navigate the diverse landscape of LLM pipeline libraries and make an informed decision.
Frequently asked questions
LLM frameworks are tools that help developers use large language models (LLMs). Some are provided as libraries, but others provide user interfaces for building and deploying LLMs.
An LLM framework is a tool that helps developers build and deploy large language models. It typically includes components for data loading, model training, and inference.
LangChain is an open-source LLM orchestration framework that simplifies the development of AI applications. It provides a unified platform for developing and integrating popular LLMs with external data sources and workflows.
LlamaIndex is a versatile open-source LLM orchestration framework that excels in search and retrieval tasks. It offers a detailed and structured metadata schema, making it an excellent choice for projects requiring robust search capabilities.
Language models are AI models that can generate human-like text based on input prompts. They are used in a wide range of applications, including chatbots, translation, and content generation.
The best framework for LLM apps depends on your specific requirements. LangChain is a versatile framework that simplifies the development of AI applications, while LlamaIndex excels in search and retrieval tasks.